How to Add Captions to Zoom Video Conference Recordings
 Zoom is a cloud video conferencing platform that allows online video conferencing and group collaboration. You can record a Zoom meeting as a video to use for future reference or to share with absent colleagues.
Zoom offers a streamlined live captioning solution to help ensure that the information exchanged during its meetings, chats, and webinars can be easily shared with any participants who may be d/Deaf, hard-of-hearing, or speak a different language.
This guide provides step-by-step instructions on how to add closed captions to Zoom (and transcripts) to make recorded meetings accessible.
To learn how to add captions to Zoom recordings, download our free how-to guide.
Step 1 – Record and Download your Zoom Meeting
While you are in a Zoom meeting, select “Record” from the menu bar.

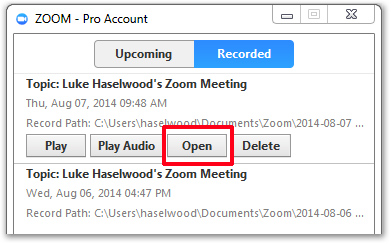
After the meeting has been recorded, open your client menu and select Meetings > Recorded. Click Open and choose the MP4 file. This will open the recorded file on your computer. The default location for recorded files is /Documents/Zoom/
Also, see additional documentation on recording and downloading your Zoom meetings.
Step 2 – Submit Your Zoom Recording for Transcription
Log into your 3Play Media account.
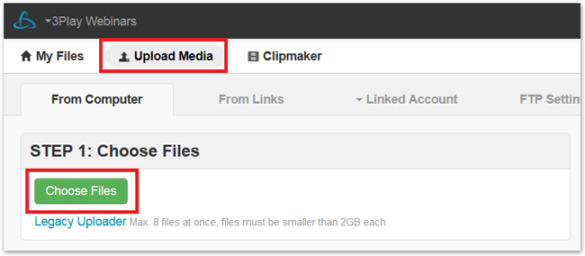
From the Upload tab at the top of the screen, select From Computer, choose your video, and follow the onscreen prompts to specify turnaround. You’ll receive an email when your video has been transcribed.
For additional details, read the support article on uploading videos for transcription and captioning.
Step 3 – Order Captions Encoded Into Your Recording
This step will produce a self-contained M4V file with embedded closed captions that can be turned on or off by the end user. There is also an option to produce an M4V file with open captions that are burned into the video and can’t be turned off.
Once you’ve received an alert that your video has been transcribed, log into your 3Play Media account.
Select My Files from the top navigation.
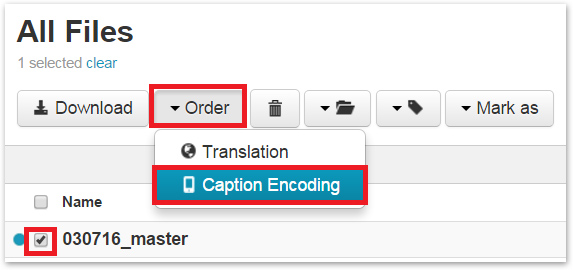
Check the box next to your Zoom recording, and select Order > Caption Encoding.
The caption encoding process may take up to 4 hours. Upon completion, you will receive an email notification with a link to download the captioned video.
Why Use Video Transcripts?
Since your video needs to be transcribed to create closed captions anyway, why not download your meeting transcript and share that with attendees, too?
Video transcripts are great for skimming your meeting content.
Digital transcripts are easily searchable so you can find what you’re looking for immediately.
Blind and deaf-blind people may need a text transcript that is accessible by screenreader. If a person with a disability requests a downloadable transcript of your Zoom meeting, you may be required by federal accessibility law to provide one.
Download Transcript of Zoom Recording
To download a transcript of your Zoom meeting, navigate to your file from My Files on your 3Play account.
Check the box next to your file and hit Download.
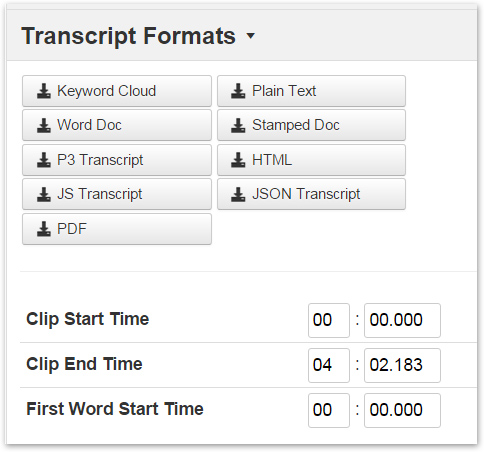
Click on Transcript Formats, and a range of file formats will display.
Select the file format(s) you want for your downloadable transcript. A plain text file, PDF, or MS Word Doc should be sufficient for most transcript needs. If you want a transcript with time stamps included, select “Stamped Doc.”
Once you click on a file format, your transcript will immediately download to your computer.
How to Add Subtitles to Zoom Recordings
If you want to add subtitles in other languages, submit your Zoom recording for translation.
In your 3Play Media account, click on your video file under My Files.
Select Order > Translation.
Choose the language you want for your subtitles, as well as the style of translation.
Once your translation is completed, follow Step 3 above to encode subtitles into your video. You can also download a transcript of the translation.

To learn how to add closed captions or subtitles to Zoom recordings, download our free how-to guide.

